
Charles抓包工具使用细节记录
使用方法
- 第一步,下载安装并打开Charles
- 第二步,去掉 【Proxy】菜单 下面的【Mac OSX Proxy】和【Mozilla Firefox Proxy】前面的 “勾”
- 第三步,让手机和电脑处在同一个局域网(即连接同一个WiFi)
- 第四步,打开手机的设置(Setting), 选择无线局域网,
特殊情况:
注意事项:
当我们不抓包的时候,会将Charles关闭,
这时候iOS是无法访问网络的,因为iOS手机上设置了代理(就是Charles),而Charles已经退出了
这时候需要将iOS中的代理关闭,这个是抓包者经常犯的。
注意事项:
如果在mac上登录apple id 时提示:
连接apple id服务器时出错,那么请先退出抓包工具Charles
Charles 破解步骤
Fidder使用C#开发的,不能在Mac上使用,
Charles是Java开发的,跨平台,可在Mac上、Linux、Window下使用,当然需要安装JDK才能运行
一、下载
Charles官网: http://www.charlesproxy.com/
二、破解
破解很简单就是替换一个文件就可以了,
可以搜索关键字: Charles4.2.6破解 jar文件
破解步骤:
打开Mac的应用程序目录,右键Charles.app, 选择显示包内容
然后, 进入Contents->Resources->Java目录
然后将下载的charles.jar替换掉这里的charles.jar就可以了。
再次打开Charles,就不会太提示30天使用期限了,破解完成
Charles 抓包步骤
第一、HTTP抓包
1、打开Mac上的Charles.app程序
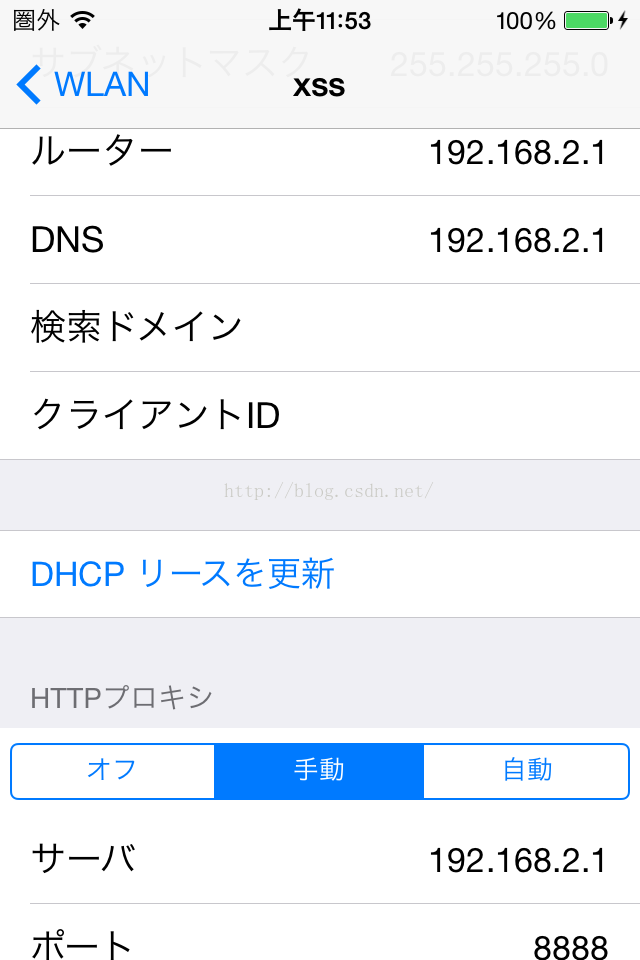
2、查看Mac电脑的IP地址,系统偏好设置->网络, 比如ip地址是:192.168.1.67
3、打开iOS手机中的设置界面,进入当前WiFi连接(必须和Mac连接同一个局域网),设置HTTP代理,将服务器填为上一步中获得的IP,即192.168.1.67,端口必须填: 8888
4、在iOS设备上, 打开想要抓包的app进行网络数据获取操作
5、Mac上的Charles将会弹出一个确认框,点击Allow按钮即可
第二、HTTPS抓包
需要下载Charles证书http://www.charlesproxy.com/ssl.zip,
https://www.charlesproxy.com/documentation/additional/legacy-ssl-proxying/
(注意: 详细的根证书 下载安装, 在文章最后面有写到)
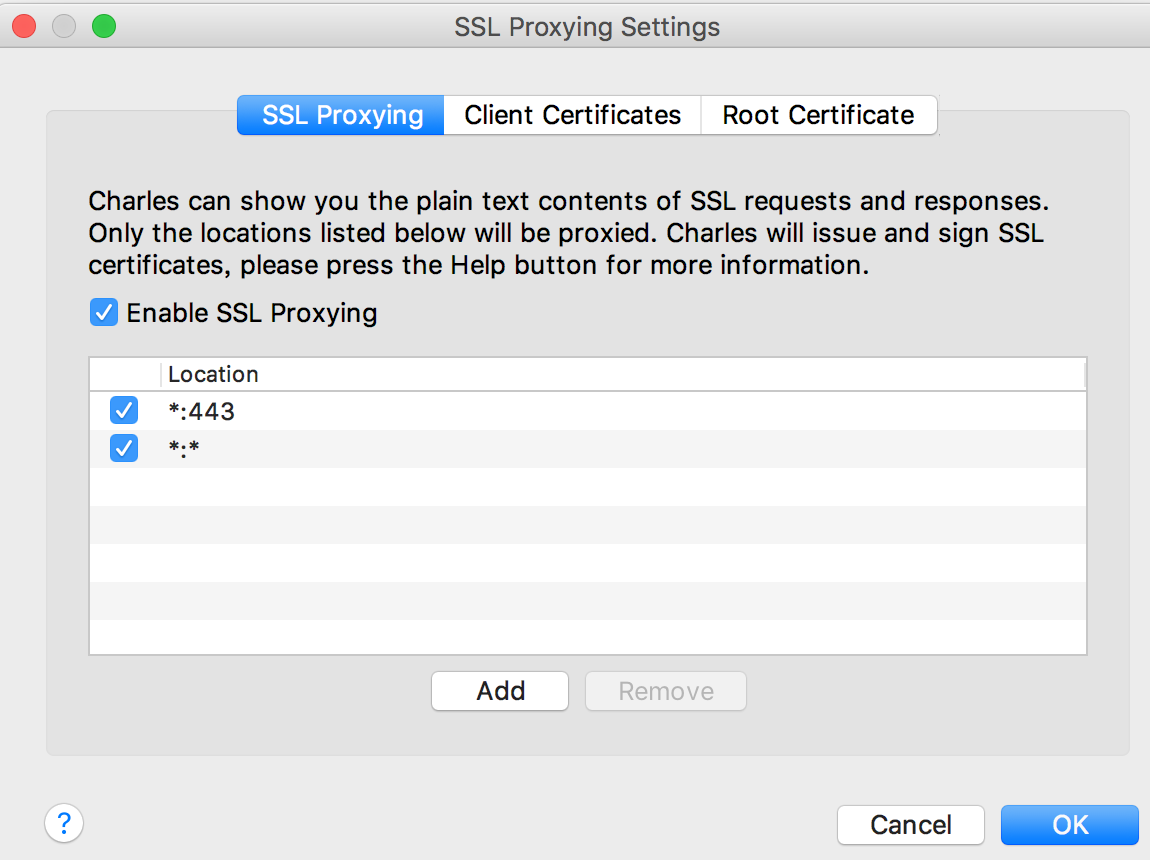
然后在Charles的工具栏上点击Proxy按钮,
选择 Proxy Settings…
切换到SSL选项卡,
选中Enable SSL Proxying,
Charles需要在上一步的SSL选项卡的Locations表单填写要抓包的域名和端口,
点击Add按钮,在弹出的表单中Host填写域名,Port填443
如图所示:
HTTPS 抓包 证书配置
首先官网下载Charles V4.2.6, 然后破解
注意: 如果破解过程中(即charles.jar进行包内覆盖时),报错: 出现了程序损坏,要你扔进垃圾箱时, 先按住ctrl,再打开程序即可
再次打开Charles抓包时,发现许多网站都无法打开了,
说是https连接提示证书不信任, 并且当关掉Charles又可以正常访问
这时候,就需要打开Charles.app应用,
找到Help菜单下的 SSL Proxying
如图所示

根据官网的提示安装证书:
https://www.charlesproxy.com/documentation/using-charles/ssl-certificates/
https://www.charlesproxy.com/documentation/proxying/ssl-proxying/
具体不同应用上证书安装步骤摘抄如下:
SSL Certificates
Charles generates its own certificates for sites, which it signs using a Charles Root Certificate, which is uniquely generated for your installation of Charles (as of v3.10).
You will see a warning in your browser, or other application, when it receives that certificate because the Charles Root Certificate is not in your list of trusted root certificates. See SSL Proxying.
You can choose to permanently trust each site’s certificate as you encounter it, in which case you do not need to trust the Charles Root Certificate.
If you would like to automatically trust every certificate issued by Charles, continue with these instructions.
The following instructions are for different browsers and applications to help you trust your Charles Root Certificate so you no longer see certificate warnings.
Note that the Charles Root Certificate approach changed with version 3.10 of Charles, so if you have already followed this procedure for an older version of Charles you will need to do it again.
Mozilla Firefox
First ensure that Firefox is connected to Charles. You should see browsing from Firefox being recorded in Charles.
Visit https://chls.pro/ssl in Firefox.
You will be presented with a certificate import dialog.
Tick the option “Trust this CA to identify websites” and complete the import.
macOS
In Charles go to the Help menu and choose “SSL Proxying > Install Charles Root Certificate“.
Keychain Access will open.
Find the “Charles Proxy…” entry, and double-click to get info on it.
Expand the “Trust” section, and beside “When using this certificate” change it from “Use System Defaults” to “Always Trust”.
Then close the certificate info window, and you will be prompted for your Administrator password to update the system trust settings.
You may need to quit and reopen Safari to see the change.
iOS devices
真机设备请注意:
第1步, 在手机上使用代理(就是设置代理ip为电脑的ip 和 端口为8888)
第2步, 在手机上下载证书: https://chls.pro/ssl
第3步: 千万记得要打开开关:
通用->关于->证书信任设置(最底部)->Charles Proxy CA(打开开关)
1. Set your iOS device to use Charles as its HTTP proxy in the Settings app > Wifi settings.
2. Open Safari and browse to https://chls.pro/ssl. Safari will prompt you to install the SSL certificate.
3. If you are on iOS 10.3 or later, open the Settings.app and navigate to General > About > Certificate Trust Settings, and find the Charles Proxy certificate, and switch it on to enable full trust for it (More information about this change in iOS 10).
Now you should be able to access SSL websites with Charles using SSL Proxying.
Charles supports App Transport Security (ATS) as of the 3.11.4 release.
iOS Simulators
1. Quit your iOS Simulator.
2. Launch Charles and go to the Help menu.
3. Choose the “SSL Proxying > Install Charles Root Certificate in iOS Simulators” item.
4. This will install your Charles Root Certificate into all of your iOS Simulators.
5. Now when you start the iOS Simulator, you should be able to access SSL websites with Charles using SSL Proxying.
Google Chrome
On macOS, please follow the instructions for macOS above. These instructions only apply on Windows.
In Charles go to the Help menu and choose “SSL Proxying > Save Charles Root Certificate”. Save the root certificate as a Binary Certificate (.cer) to your desktop, or somewhere where you can easily access it in the next step.
In Chrome, open the Settings. At the bottom of the settings page, click “Advanced” to open the advanced section, then click the “Manage certificates…” button.
Go to the “Trusted Root Certification Authorities” tab and click “Import…”.
Find the certificate file you saved from Charles in the previous step, then click Next and Finish, leaving the default options, until you complete the import. Chrome will now always trust certificates signed by Charles.
After importing you can delete the certificate file that you saved.
Python
Python’s requests module will fail with an error when you try to use it with SSL Proxying in Charles:
requests.exceptions.SSLError: [SSL: CERTIFICATE_VERIFY_FAILED] certificate
verify failed (_ssl.c:590)
You can configure requests to trust your Charles Root Certificate.
First save your certificate as a .pem file using the Help > SSL Proxying > Save Charles Root Certificate menu.
Then configure your Session as follows:
from requests import Session
session = Session()
session.verify = “charles-ssl-proxying-certificate.pem”